Saturday 23 December 2017

Generating dates for given date range (SQL Server)

Ever came across situation where you need to find out dates for the given date range. I recently did and came up with below approaches to do the same.

Note: I have used SQL server 2012 to test these code changes.

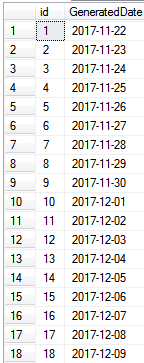
Assume that you are given a start date as '11-21-2017' and end date as '12-10-2017' and you need to list out (generate) all the dates in between. How would you do that?
You can basically reference any of the tables with number of records which is greater than the date difference of the from date and to date and should be able to run below query.

DECLARE @dt1 DATE = '11-21-2017';
DECLARE @dt2 DATE = '12-10-2017';
 
CREATE TABLE #tempTable(id INT,GeneratedDate DATE)
-- relying on sys.columns as I know there would be only 35 dates for the given range
INSERT INTO #tempTable 
SELECT TOP (DATEDIFF(DAY,@dt1,@dt2)-1) 
    ROW_NUMBER() OVER (ORDER BY (SELECT 1)) [c],
    NULL
FROM sys.columns 
 
UPDATE #tempTable
SET GeneratedDate=DATEADD(DAY,id,@dt1)
 
SELECT id ,
       GeneratedDate
FROM #tempTable

Output:

Another way to do the same is using while loop. You can start from beginning date and keep looping until you reach to the end date.

DECLARE @dt1 DATE = '11-21-2017'
DECLARE @dt2 DATE = '12-10-2017'
DECLARE @counter INT=1;
 
CREATE TABLE #tempTable(GeneratedDate DATE)
 
WHILE (@dt1<@dt2)
BEGIN
    SELECT @dt1 = DATEADD(DAY,@counter,@dt1)
    INSERT INTO #tempTable
         ( GeneratedDate )
    VALUES  ( @dt1 
           )
END
SELECT * FROM #tempTable


For the first approach, you can rely on tables as long as you have the number of rows more than the date difference but what if you need to test out the date range with difference more than the number of record in that table.

With common table expression variables, you can create rows using (Table Value Constructors) and generate n rows without referencing any table. Simple implementation is as below. It also generates the same list as above.

Try playing around the number of records you can generate with cross joins. In my case, it would generate (95) records, which are good enough to find the dates for a huge range. If you need more, you can keep adding the CTE variable and it would work.

DECLARE @dt1 DATE = '11-21-1930';
DECLARE @dt2 DATE = '12-10-2017';
 
WITH myCTE AS 
(
    SELECT MyTable.number 
    FROM 
  (VALUES (1),(2),(3),(4),(5),(6),(7),(8),(9)) MyTable(number)
)
SELECT TOP (DATEDIFF(DAY,@dt1,@dt2)-1) 
    ROW_NUMBER() OVER (ORDER BY (SELECT 1)) [Index],
    DATEADD(DAY,ROW_NUMBER() OVER (ORDER BY (SELECT 1)),@dt1) [Generated Date]
FROM myCTE cte1,myCTE cte2, myCTE cte3, myCTE cte4, myCTE cte5

If you have other ways to achieve the same, please feel free to leave the comments/suggestions.

Thursday 7 December 2017

Format Specifiers in Visual Studio Debugger (using C#)

Below are the few format specifiers developers can use while debugging the applications which can help reducing debugging time by certain clicks/expansions (in a Watch window). 
I have tested these code samples using Visual Studio 2017 Community Edition.

1. ac


Often working with LINQ queries, we try to evaluate the expression/query into watch window and on upon stepping through the lines we may need to check the result for the same query and click on small refresh button to get the updated value. That is going to be tedious work if we need to keep evaluating the same for lengthy code. Well, there is a way to avoid that. Using format specifiers (while debugging), you can force the evaluation of the expression.


For example, consider below code, demo class containing ID and the name properties. I have decorated class with DebuggerDisplay attribute to view the elements in watch window. For more details, please visit my article on the same here.

[DebuggerDisplay("{ID}:{Name}")]
public class DemoClass
{
    public int ID { getset; }
    public string Name { getset; }
 
}

Inside the main method, I am populating the list of the DemoClass objects.

List<DemoClass> lstDemoClasses = new List<DemoClass>();
for (int i = 0; i < 5; i++)
{
    lstDemoClasses.Add(new DemoClass { ID = i, Name = $"name {i}" });
}
var somequery = lstDemoClasses.Where(obj => obj.ID % 3 == 0).ToList();
 
lstDemoClasses.Add(new DemoClass { ID = 100, Name = "name 100" });
Console.WriteLine();


Consider that you have some query (dummy query) where you want to list the objects whose ID is divisible by 3. And at the same time, you want to list the objects whose ID is even. For the same, I am adding the lambda query in my watch window like this.


Watch Window:


Now the moment I step through the breakpoint above, it is going to add one more object to the collection and query in watch window not going to be evaluated as shown in watch window. In order to evaluate query, one may need to hit that little refresh button and then it would work. For the most cases, it is okay to hit and go back to debugging but with couple of queries together it would be little time consuming.


To avoid these clicks, you can use the format specifiers for the watch window. For example, to force the evaluation of expression in watch window, you can specify ac separated by comma in Name column as below.


So now, when you step through the breakpoint (where it adds an object to collection with id as 100), debugger forces the evaluation of the query in watch window and you don’t need to hit refresh button.

2. results

Another format  specifier comes handy when you need to view the complex queries in watch window that holds list/collection.
For example, below is the sample code for the same. I have list of strings and I am creating dynamic object that holds the list of names with their length (where length of the name is greater than 4).

List<string> names = new List<string>()
{
    "str 1",
    "string 2",
    "test string 3",
    "test string 4121"
};
var linqQuery = names.Where(nm => nm.Length > 4).Select(obj => new
{
    id = obj.Length,
    names = obj
});
Without any specifier, watch window looks something like below:


By default, it shows some of the private variables from this dynamic object and you can change this behavior if you are focused on the results view only. Using results specifier, you would only see the result/collection directly. You can skip the in between privates and avoid one click while debugging.


3. nq


Using this specifier, you can view the string without quotes (no quotes). It is kind of least useful but I thought to mention it here, just in case.


There are few more specifiers you can go through the same here.

Please feel free to comment the suggestion(s) to make it better.


Saturday 21 October 2017

DebuggerTypeProxy Attribute

Another cool attribute to save some debugging time is DebuggerTypeProxy (Namespace: System.Diagnostics). Using this attribute, you can write your own logic to interpret the object at debug time. Meaning, if you have a list of a class objects then you can project on certain property and force debugger to show the value off of this proxy class.

Below is the example where I have created a dummy model class. Using DebuggerTypeProxy attribute on this class, I am forcing debugger to display value of a property of the proxy class, which is DebuggerProxyForTestDebuggerProxy class.


    [DebuggerTypeProxy(typeof(DebuggerProxyForTestDebuggerProxy))]
    public class TestDebuggerProxy
    {
        public int DeptID;
        public string DeptName;
        public List<string> EmpNames = new List<string>(); 
    }

Proxy class:
public class DebuggerProxyForTestDebuggerProxy
    {
        TestDebuggerProxy instance;
        public DebuggerProxyForTestDebuggerProxy(TestDebuggerProxy obj)
        {
            instance = obj;
        }
        public string DeptInformation
        {
            get
            {
                return $"ID:{instance.DeptID} | DeptName:{instance.DeptName} |
                DeptEmps: {string.Join(",",instance.EmpNames)}";
            }
        }
    }

Proxy class contains the private variable of the model class(TestDebuggerProxy), constructor with a parameter of type TestDebuggerProxy(which sets the private member of the class) and it has also a member called DeptInformation which joins the properties of the private member.


Now, let's create an object of type TestDebuggerProxy in Main method.

static void Main(string[] args)
        {
 
            TestDebuggerProxy obj = new TestDebuggerProxy() { 
                 DeptID=1,
                 DeptName = "Dept 1",
                 EmpNames = new List<string> {"emp1","emp2","emp3" }
            };
            return;
        }

Now run the application in debug mode and hover your mouse over object "obj". You should see something like below.


Note that how debugger is displaying the value of the object. It is actually showing the property of the proxy class and not the actual class. You can view the actual properties of the class by expanding the Raw View.


This is really simple implementation of how it works but it can be very useful in legacy applications where you have complex objects and you need to check certain properties only while debugging the issue(s).

Thursday 27 July 2017

DebuggerDisplay Attribute

While working on complex classes/objects, it really takes two more clicks to either add that object to the Watch window or expand the object in visualizer and navigate to specific property.
To avoid these extra steps and to make your debugging bit faster, you can decorate class with specific property using DebuggerDisplay attribute. Applying this attribute makes sure that when you add object to Watch window, it displays the value of above property in Value column.

For example, I have below Model class for which I am creating an object and list of objects with some dummy values. Also, I have decorated this class with DebuggerDisplay attribute that has definition as to display name of the person, ID of the person and length of a name.

/// <summary>
/// Debugger Display Attribute – Model class
/// </summary>
[DebuggerDisplay("Emp ID = {name} - {ID} - {name.Length}")]
public class TestDebuggerDisplay
{
    public string name
    {
      get; set;
    }
    public int ID
    {
      get; set;
    }
}

Main Class:

class Program
{
    static void Main(string[] args)
    {

        TestDebuggerDisplay obj = new TestDebuggerDisplay() { ID=1, name="name1" };
        List<TestDebuggerDisplay> lstObjs = new List<TestDebuggerDisplay>();

        for (int i = 0; i < 5; i++)
        {
        lstObjs.Add(new TestDebuggerDisplay()
                {
                ID = 10 * (i + 1),
                name = $"name{10 * (i + 1)}"
                }
                );
         }

            Console.WriteLine();
   }
}

Output:

While you are debugging, you would see that, when the object is added to watch window you can see the value for that object as below:


Sunday 23 July 2017

DebuggerStepThrough Attribute

While working on a complex code/ software, we often come across situations where you need to debug lots of code to find/fix the issue. That also includes going through lots of methods (probably related or unrelated). .NetFramework provides way to avoid unwanted "Step in" through methods. Using DebuggerStepThrough (using System.Diagnostics) attribute, you can skip debugging of unwanted methods and reduce the debugging time to some what extent.
For example, I have below class file that contains two classes ( a class in which there is a method to reverse a string and a class that logs reversed string to output window.).

If DebuggerStepThrough attribute is applied to method, any breakpoints inside that method won't be hit while debuggin the application.

If DebuggerStepThrough attribute is applied to class, any breakpoints inside the class will not be hit.
 
class Program
    {
        static void Main(string[] args)
        {
            //Console.WriteLine("test");
            string name = "TestString";
            name = ReverseString(name);
            Console.WriteLine(name);
            Logger.LogMessages(name);
 
        }
 
        private static string ReverseString(string name)
        {
            Debug.WriteLine(name);
            Debug.WriteLine(name.Length);
            char[] strArray = name.ToCharArray();
            Array.Reverse(strArray);
 
            return new string(strArray);
        }
    }
Second class:
public class Logger
   {
       [DebuggerStepThrough]
       public static void LogMessages(string data)
       {
           if (data==null)
           {
               Console.WriteLine("Null Variable");
           }
           else
           {
               Debug.WriteLine(data);
           }
 
       }
   }
Output:

Saturday 11 February 2017

C# Backgroundworker

BackgroundWorker is the class in System.ComponentModel which is used when you need to do some task on the back-end or in different thread while keeping the UI available to users (not freezing the user ) and same time, reporting the progress of the same.
Backgroundworker has three event handlers which basically takes care of everything one needs to make it work.
  1. DoWork – Your actual background work goes in here.
  2. ProgressChanged – When there is a progress in the background work
  3. RunWorkerCompleted – Gets called when background worker has completed the work.
I have created a sample WPF application which demonstrates how to use the background worker in c#.
XAML:
 <ProgressBar x:Name="progressbar" HorizontalAlignment="Left" Height="14" Margin="191,74,0,0" VerticalAlignment="Top" Width="133"/>
 <Button x:Name="button" Content="Button" HorizontalAlignment="Left" Margin="249,97,0,0" VerticalAlignment="Top" Width="75" Click="button_Click"/>
  
On Window initialization, I am creatin a new object of BackgroundWorker and registering the event handlers for the same.
 BackgroundWorker bg;
public MainWindow()
{
InitializeComponent();
bg = new BackgroundWorker();
bg.DoWork += Bg_DoWork;
bg.ProgressChanged += Bg_ProgressChanged;
bg.RunWorkerCompleted += Bg_RunWorkerCompleted;
bg.WorkerReportsProgress = true;

}
Here is the implementation of all three event handlers.
private void Bg_RunWorkerCompleted(object sender, RunWorkerCompletedEventArgs e)
{
MessageBox.Show("Task completed");
}

private void Bg_ProgressChanged(object sender, ProgressChangedEventArgs e)
{

progressbar.Value += 1;
//label.Content = e.ProgressPercentage;
}

private void Bg_DoWork(object sender, DoWorkEventArgs e)
{
for (int i = 1; i &lt;= 10; i++)
{
Thread.Sleep(1000); //do some task
bg.ReportProgress(0);
}
}

In order to make this stuff work, you need to trigger the DoWork event and for that , I am using button click event.
progressbar.Value = 0;
progressbar.Maximum = 10;
bg.RunWorkerAsync();

It is very basic example of background worker but it is good to start with.

One must be wondering how it is updating the progress bar if it is working in background.

Well, the ProgressChanged event handler runs on UI thread where as DoWork run on application thread pool. That’s why despite running in the background on different thread, it is not freezing the UI and updating the progressbar upon making progress.
Please leave your comments for any question concerns.

Please note that all my articles and posts are open for suggestion(s) or correction(s).

Creating public class by default Visual Studio


Recently, I came across a silly mistake – where, I was not able to see my newly created class in intellisense in visual studio.

After starting from the scratch, it came to notice that by default visual studio creates class without access specifiers and that is the reason, it became private and it didn't show up in Intellisense.
You can fix it. Here is how. When you try creating new class, it uses the template located under path:

%systemdrive%\Program Files (x86)\Microsoft Visual Studio 14.0\Common7\IDE\ItemTemplates\CSharp\Code\1033\Class

You should see the file named class.cs which has content as below.

using System;
using System.Collections.Generic;
$if$ ($targetframeworkversion$ >= 3.5)using System.Linq;
$endif$using System.Text;
$if$ ($targetframeworkversion$ >= 4.5)using System.Threading.Tasks;
$endif$
namespace $rootnamespace$
{
class $safeitemrootname$
{
}
}
Here, change the class definition by adding Public access specifier and save/override the file.
public class $safeitemrootname$

You should be good to go.
Please leave your comments for any question concerns.
Please note that my post is open for suggestion(s) or correction(s).